
Customer trust and data security is a top priority at Qualified. It’s our goal to help protect your business from vulnerabilities while also increasing productivity for your teams. That’s why we offer SSO (single sign-on) through multiple Identity Providers (IdP)—including Okta, Azure, and OneLogin. Qualified Enterprise SSO helps your team access Qualified through a single entry point and gives IT complete control.
In this article, we’ll go over how to configure SSO for your Qualified account specifically using the IdP Azure AD.
Find your Company ID in Qualified
- Log in to your Qualified account and click the Settings icon.
- From the left panel, click Single Sign-On.
- Select Azure AD (SAML 2.0) in the drop-down.
- Locate your Company ID, which appears below Copy this Company ID and paste it into your Identity Providers.
- Copy your Company ID from Qualified and paste it within this link:
https://app.qualified.com/auth/saml/[PASTE_YOUR_COMPANY_ID_HERE]
Create the Qualified SAML App in Azure AD
- Log in to your Azure account and create an enterprise app with SAML capability called Qualified. Use this image for the logo:

- Assign the app to yourself.
- In the Azure portal, click the Edit icon in the Basic SAML Configuration section.
- In the Identifier (Entity ID) field, enter https://app.qualified.com.
- In the Reply URL (Assertion Consumer Service URL) field, enter the link you customized above with your Company ID.
- Click Save.
Update User Attributes & Claims
- From the Azure portal, click the Edit icon in the User Attributes & Claims section.
- Delete all the default attributes, except Unique User Identifier (Name ID).
- Click +Add new claim and create these additional claims:
Claim Name Value first_name user.givenname last_name user.surname saml_id user.objectid
The configuration looks like this: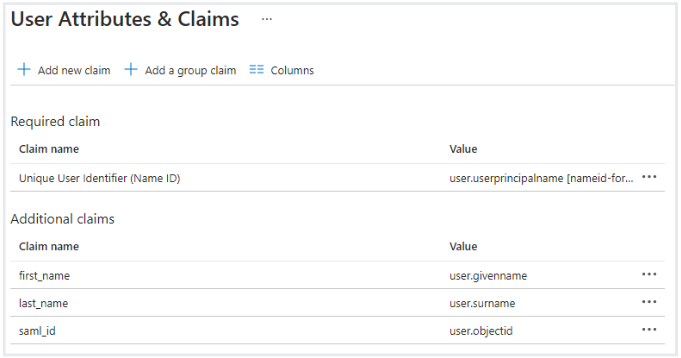
- Return to the main SAML Configuration screen.
- Copy the App Federation Metadata Url.
Finalize Your SSO with Qualified
- Return to your Single Sign-On Settings in Qualified.
- From the Select your Identify Provider drop-down, select Azure AD (SAML 2.0).
- Paste the link you copied from Azure into the Enter the Metadata URL given to you by your Identify Provider field.
- Click Save.
- Click Verify Configuration. A pop-up window will appear and run through a full SSO login flow. If it works correctly, the window will close and you’ll see a success message.
- When you’re ready, click Enable single sign-on for this team.
- A modal appears with a warning that all team members, including the Qualified admin, will be sent a link. Confirm that you are ready to enable SSO.
Before you accept, confirm within Azure AD that all of your Qualified users are assigned the Qualified SAML app.
- We’ll then email all users their unique link. Once they click it, their Azure AD SSO profile will be tied to their Qualified account.
Your team can now log in to Qualified using the new Qualified tile on your Azure AD apps dashboard.

.svg)


